Building a headless electric guitar kit is one of the most rewarding DIY guitar kit assembly projects you can take on, and you do not need to be a professional woodworker to finish one. This guide walks you through the whole build: prepping and finishing the solid body, bolting on the neck, mounting the headless tremolo bridge, wiring the humbucker and single-coil pickups, and dialing in the action and intonation. The one big difference from a normal build is the headless design itself. There is no headstock and there are no tuners at the top of the neck, so the strings clamp at the neck end and you tune at the bridge. We will explain exactly how that works before you touch a single string.
Difficulty: Intermediate
Build time: 15 to 40 hours of hands-on work spread across 1 to 3 weeks (most of the calendar time is finish curing, not labor)
Kit: Headless Guitar Kits
Deep-dive modules (universal references that go deeper than any single manual):
Finishing and painting · Neck installation · Wiring and soldering · Final setup
How the headless system works (read this first)
A traditional electric guitar anchors the ball end of each string at the bridge, then runs the string up to a tuning machine on the headstock, where you wind it to pitch. A headless guitar removes the headstock entirely and moves the tuning job to the bridge. This changes two things you need to understand before you build.
The neck end has a string clamp, not tuners. Where a normal guitar would have a nut and tuning posts, a headless neck ends in a small metal clamp block (sometimes called a string lock). You seat the string into the clamp and tighten a screw so the clamp grips the string hard enough to hold full playing tension. Because there is no winding post to take up slack, this clamp is doing the whole job of holding that end of the string in place, so it needs to be genuinely tight (firm and secure, not stripped).
The bridge does the tuning. On a headless guitar the bridge carries a fine-tuner for each string, usually a thumbwheel or a small knob on each saddle. Turning it moves the saddle a tiny amount and raises or lowers the pitch. That is your only tuning control, so all six of your tuning adjustments happen at the bridge, down by your picking hand.
Strings load in the opposite order. On a normal guitar you fix the ball end at the bridge and wind the free end at the top. On a headless guitar you anchor one end at the bridge saddle, run the string up to the neck-end clamp, pull it hand-tight to roughly the right tension, lock the clamp, and then bring it to exact pitch with the bridge fine-tuner. The fine-tuner only has a small range of travel, often a semitone or two, so you have to get the string close to pitch by hand before you lock the clamp, or the fine-tuner will run out of adjustment.
String type matters. Some headless systems use double-ball-end strings that hook at both ends. Others use ordinary single-ball strings held by the neck-end clamp, sometimes after trimming. Your kit ships with a set of strings that suits its hardware, so use those first and check your kit’s card or product page before you buy replacements, because the wrong string type will not seat correctly.
Because both ends of each string are locked down solidly, a well set-up headless guitar holds tune very well. The trade-off is that string changes take a little more care than on a normal guitar, since you are seating and clamping rather than winding.
What’s in the box
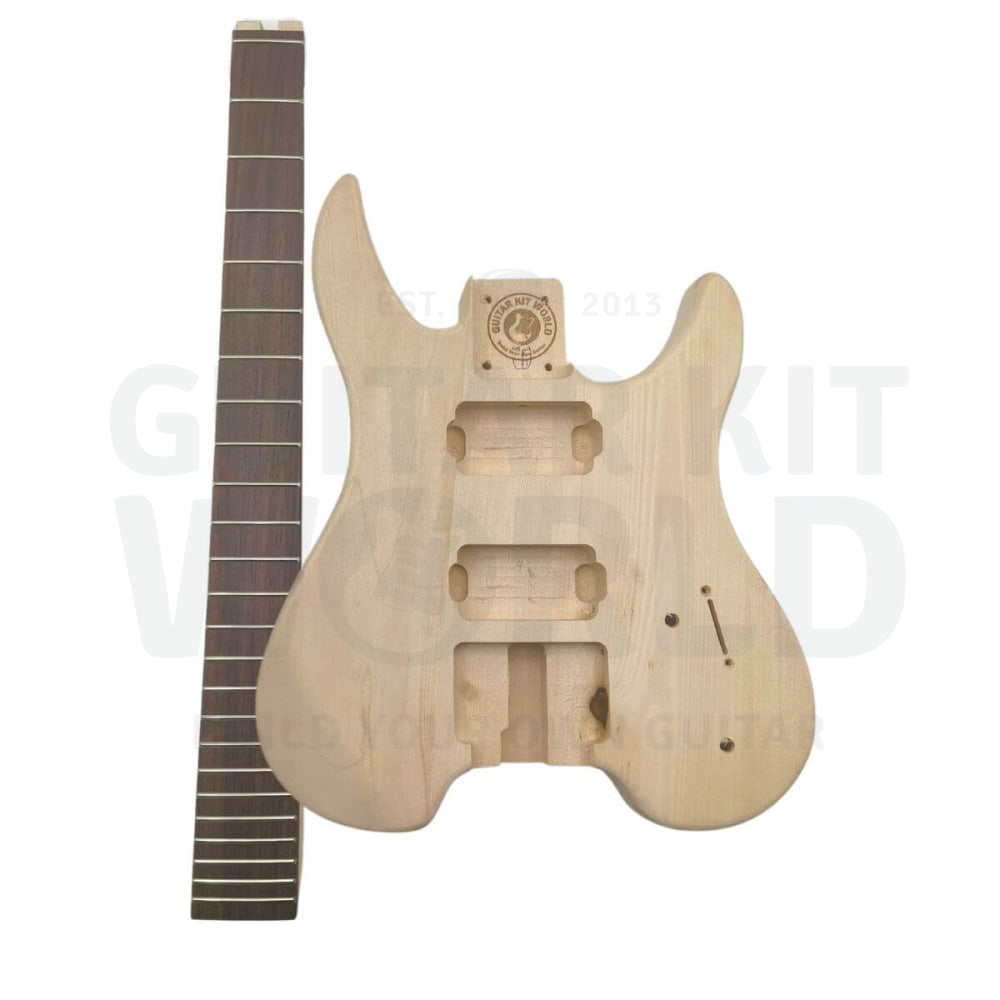
Your kit is a bolt-on, solid-body headless guitar in a humbucker-and-single-coil layout. Contents can vary slightly between runs, so check everything against your kit’s own parts card. A typical kit includes:
- Prepped headless body (routed and drilled, ready to finish)
- Completed neck
- Neck plate, neck plate cushion, and neck screws
- 2 x strap buttons
- Headless tremolo bridge
- Whammy bar (vibrato arm)
- Electronics: 1 volume knob, 1 tone knob, and a 5-way selector switch
- 1 humbucker pickup with mounting ring
- 2 single-coil pickups
- Input jack
- Hex wrench for adjusting the truss rod
- Set of strings
- Assorted screws and washers
If your kit is a different pickup layout (some headless kits ship as a dual-humbucker), the wiring section still applies in principle, but follow the diagram that comes with your own pickups.
Tools you’ll need
- Steel ruler (at least 40 cm)
- Hard sanding block
- Center punch, or a similar tool for marking hole locations
- Electric drill and assorted drill bits
- Large and small screwdrivers (Phillips head and flat head)
- Pliers (needle-nose preferred)
- Soldering iron
Consumables you’ll use
- Disposable gloves
- Small paintbrush
- Wood grain filler (if you have an open-grain timber such as mahogany or oak)
- Sandpaper in various grades, from 120 up to 1500 (depends on your finish)
- Finishing supplies (depends on your choice of finish)
- Painter’s masking tape
- An assortment of clean rags and paper towel
- Denatured alcohol, or a cleaning product with degreasing ability
- 0000 fine-grade steel wool
- Solder, plus a sponge for cleaning the tip of the iron
- A container for storing your finishing supplies
Section 1: Inspect the kit and dry-fit everything
Before any finishing or drilling, lay out every part and check it against the list above. Look for shipping damage, confirm the neck seats into the body pocket, and make sure the bridge and clamp hardware are all present. Finding a missing or wrong part now, before you have applied finish, saves a lot of grief later.
Safety first. Finishing and drilling produce dust and fumes. Work in a well-ventilated area. Wear protective eyewear when drilling or cutting, disposable gloves when handling finish and solvents, and a dust mask rated N95 or R95 when sanding or spraying to avoid breathing in particles and fumes. Keep solvents away from any flame or heat source.
Dry-fit the neck. Slide the neck into the body pocket without any screws. It should sit snugly with no side-to-side wobble. Do not force it. If the fit is very tight because of finish you plan to add later, note that now, because you never want to finish inside the neck pocket (more on that below).
Sight the string path. This is the headless-specific check. Hold the bridge roughly in its mounting position and look down the neck from the clamp end toward the bridge. The line of the strings should run straight down the centre of the neck and land evenly across the bridge saddles. You are confirming that the neck, the neck-end clamp, and the bridge will all line up before you commit to screw holes.
Read each following section fully before you start it. There is no rush, and the most common beginner mistake is hurrying.
Section 2: Prepare and finish the body and neck
Finishing is the stage that takes the most calendar time and makes the biggest difference to how your guitar looks. You can stain it, paint it, or apply a hand-rubbed oil finish. This is a large, self-contained skill, so take it at its own pace.
Sand the bare wood. Start with the body and neck in bare wood. Work through the grits in order, typically starting around 120 and moving up, sanding with the grain and using your hard block on flat areas so you do not round off edges you meant to keep crisp. Wipe the dust off with a clean rag between grits.
Fill open grain if needed. If your body is an open-grain timber such as mahogany or oak, apply wood grain filler and let it dry, then sand it back flush so the surface is smooth. Tight-grain timbers can usually skip this.
Raise and knock back the grain. Wiping the bare wood with a damp rag raises tiny wood fibers. Let it dry, then knock them back with a fine sanding pass. This stops the first coat of finish from raising a fuzzy surface.
Mask what should stay bare. Use painter’s masking tape to protect areas that must not get finish: the neck pocket (finish there changes the neck fit and the neck angle), the pickup and control cavities, and any bridge or hardware mounting area you want to keep to bare wood. Wipe the surface with denatured alcohol to remove grease before your first coat.
Apply your finish in thin coats. Whether you stain, paint, or oil, thin coats beat thick ones every time. Let each coat dry fully, then lightly de-nib with fine sandpaper or 0000 steel wool before the next coat. Follow the specific instructions for the product you chose.
Cure before assembly. Let the finish cure hard before you start bolting on hardware. Fresh finish that feels dry on the surface can still be soft underneath, and clamping hardware onto soft finish will leave dents. When it is cured, a final rub with 0000 steel wool and a clean cloth gives a smooth, even feel.
For a deeper walk-through of finishing options, see Guitar Kit World’s guitar finishing guide and the guide on painting a solid-body guitar.
Section 3: Install the neck
Your kit is a bolt-on, which means the neck attaches to the body with screws through a neck plate rather than being glued in.
- Seat the neck fully into the pocket.
- Place the neck plate cushion against the back of the body, then the neck plate over it, lining the screw holes up with the pocket.
- Check alignment before you drill or drive anything. On a headless build, alignment means the neck sits centered so the string path runs straight from the neck-end clamp to the bridge saddles. Sight down the neck and adjust its position in the pocket until it is centered.
- If the body is not pre-drilled for the neck screws, mark the hole centers with a center punch, then drill pilot holes. A pilot hole should be roughly two-thirds the thickness of the screw’s threaded core, deep enough to guide the screw without splitting the wood.
- Drive the neck screws in evenly, snugging them in a cross pattern rather than fully tightening one at a time. They should be firm and secure. Do not overtighten and crush the wood.
Once the neck is on solidly, it should feel like one rigid piece with the body and have no movement in the pocket.
Section 4: Install the strap buttons
Fit the two strap buttons at the positions provided on the body (typically the lower end and the upper horn or heel area). If the holes are not pre-drilled, mark the spot with a center punch and drill a pilot hole sized to the screw, then drive the button screw in with its washer. Snug it firmly so the button will not work loose under the weight of the guitar, but do not force it once it is seated.
Section 5: Install the headless tremolo bridge and neck-end string clamp
This is the heart of a headless build, so take your time and read the whole section before you start.
Mount the bridge. Position the headless tremolo bridge in its routed location and confirm it lines up with the neck’s centreline (the string path check from Section 1). If the holes are not pre-drilled, mark them with a center punch and drill pilot holes before driving the mounting screws. If your bridge is a floating tremolo type, it will pivot on its mounting rather than sitting flat, so do not force it down solid. Seat it exactly as its own hardware is designed to sit.
Fit the tremolo springs (floating type). A floating tremolo is held in balance by springs, usually in a cavity on the back of the body, pulling against the tension of the strings. Fit the springs as supplied. You will balance them against string tension later, during setup, so that the bridge sits level and returns to pitch after you use the whammy bar.
Understand the neck-end string clamp. At the neck end, the string clamp is what holds the top of each string. Depending on your kit it may be a single clamping bar held by one or more screws, or individual clamp blocks. Loosen the clamp screws before you string up so the strings can seat, and keep the clamp hardware and its tiny screws in a dish so they do not roll away.
Fit the whammy bar. The whammy bar (vibrato arm) threads or presses into the bridge. Fit it now so you can test tremolo action once the guitar is strung, but you can leave it off while you work if it gets in the way.
We string the guitar and set the clamp tension in Section 8, once the pickups and wiring are done, so you are not fighting six strings while you solder.

Section 6: Install the pickups
Your kit uses a humbucker in the bridge position and two single-coil pickups. Pickups explained in more depth: see Guitar Kit World’s guide to electric guitar pickups.
- Mount the humbucker into its pickup ring, then fit the ring into the bridge-position rout. The humbucker’s mounting screws pass through the ring and into springs or surgical tubing that let you set its height later.
- Fit the two single-coil pickups into their routs. They mount with screws and springs (or foam) that set their height.
- Route each pickup’s wires neatly toward the control cavity, leaving a little slack so you can lift a pickup out later without straining the wires. Do not pull them tight.
- Leave final height adjustment until after setup. A rough starting point is to set each pickup so its pole pieces sit a couple of millimeters below the strings when the strings are fretted at the highest fret, then fine-tune by ear.
Section 7: Wire the electronics
Your kit wires as a humbucker and two single-coils through a 5-way selector switch, one volume control, and one tone control, out to the input jack. Wire colors differ between pickup makers, so follow the wiring diagram supplied with your own pickups rather than assuming a color code. The principles below apply to any version.
Soldering basics. Let the iron come fully up to temperature and keep the tip clean with a damp sponge. Heat the joint, not just the solder, and feed a small amount of solder onto the heated joint so it flows and forms a shiny, solid connection. A dull, blobby joint is a cold joint and can fail later, so reflow it. Work quickly on pickup and pot terminals so you do not cook the component.
The signal path. In broad terms: each pickup’s hot lead goes to the selector switch, the switch feeds the volume control, the volume feeds the tone control, and the output of the volume goes to the tip terminal of the input jack. The 5-way selector picks which pickup or pickup combination is live in each position, giving you the usual five voices from a humbucker-and-two-single-coil layout.
Grounding. Every ground connection (pickup grounds, pot backs, the tone capacitor’s ground side, and the sleeve terminal of the input jack) ties together to a common ground. A separate ground wire runs to the bridge so the metal hardware and your strings are grounded, which kills hum when you touch the strings. Make sure that bridge ground wire is trapped under the bridge or in its channel before you mount the bridge for the last time.
Tidy the cavity. Keep leads short and neat, avoid crossing high-signal and ground wires in a messy tangle, and make sure no bare wire ends touch where they should not. If your cavity has shielding, confirm nothing shorts against it. Before you close the cavity, test the guitar (see setup) so you are not chasing a wiring fault through a fully assembled instrument.
Section 8: String it up the headless way
Now that the hardware and wiring are in, string the guitar. The order is different from a normal guitar, so go one string at a time.
- Start at the bridge end. Seat the anchored end of the string into its saddle or string holder on the bridge, exactly as your bridge is designed to take it (a ball end into the saddle block, or a double-ball end hooked in place).
- Run the string up the neck to the string clamp, laying it in its slot so it tracks straight down the neck.
- Pull the string hand-tight to roughly playing tension. Getting close to pitch by hand now is important, because the bridge fine-tuner only has a small range. If you clamp a floppy string, the fine-tuner will not be able to bring it up to pitch.
- Tighten the clamp screw at the neck end to lock that string. It should grip firmly and not slip. Do not overtighten to the point of stripping the small screw.
- Bring the string to exact pitch with the bridge fine-tuner for that string.
- Repeat for all six strings, then go back and re-tune, because bringing each new string up to tension changes the tension on the ones you already did. On a floating tremolo this settling takes a few passes.
If a fine-tuner runs out of travel before the string reaches pitch, back it off, loosen the clamp, re-set the string closer to pitch by hand, re-clamp, and fine-tune again.
Section 9: Set up the guitar
Setup is what turns an assembled kit into a guitar that plays well. Work through these in order. Where a number depends on your exact kit (scale length, fretboard radius, your preferred string gauge), check your kit’s spec on the product page and adjust to your own taste.
Truss rod and neck relief. The truss rod inside the neck balances string tension against the neck’s stiffness. Use the supplied hex wrench and adjust in small amounts (roughly a quarter turn), then let the neck settle before checking again. To read relief, hold a string down at the first fret and at the last fret, and look at the gap over the middle of the fretboard. A typical starting point is a small gap of about 0.25 mm (0.010 in). Too much relief makes the action high in the middle of the neck. Too little causes buzzing. There is a fuller walk-through in Guitar Kit World’s truss rod adjustment guide.
String action (height). Action is the string height above the frets, usually measured at the 12th fret. Set it with the bridge saddle heights. A common starting point is roughly 2.0 mm (about 5/64 in) on the low string and 1.6 mm (about 1/16 in) on the high string, then lower it to taste until you get a hint of buzz, and raise it back a touch. Lower is easier to play, higher rings cleaner.
Tremolo balance (floating type). If your bridge floats, adjust the spring tension in the back cavity so the bridge sits level, or parallel to the body, when the guitar is in tune. Tightening the springs pulls the bridge back, loosening lets the strings pull it forward. This is an iterative dance with tuning: adjust springs, re-tune, repeat, until the bridge sits where it should at pitch and returns to pitch after you use the whammy bar.
Intonation. Intonation makes the guitar play in tune all the way up the neck. Compare the pitch of each open string (or its 12th-fret harmonic) with the fretted note at the 12th fret. If the fretted note is sharp, move that saddle back, away from the neck. If it is flat, move it forward. On a headless bridge you shift the saddle position and then re-tune with the fine-tuner. Work one string at a time and re-check.
Pickup height. With the guitar in tune, set final pickup heights by ear. Raising a pickup increases output but can pull the strings out of tune magnetically if it is too close, so back off if you hear odd overtones. Balance the volume between pickups so switching positions is smooth.
Recheck tuning, then play every fret on every string to listen for buzz or dead spots and make small adjustments. New strings and a new neck will settle over the first few days, so a second setup after a week is normal.
Beginner watch-outs
| Watch out for | Why it matters | What to do |
|---|---|---|
| Finishing inside the neck pocket | Changes the neck fit and neck angle, so the string path and action go off | Mask the pocket, keep it bare wood |
| Clamping a floppy string at the neck end | The bridge fine-tuner has only a small range and will not reach pitch | Pull to near-pitch by hand before you lock the clamp |
| Overtightening the neck-end clamp screws | The small screws strip easily | Tighten until the string grips firmly, then stop |
| Forcing a floating bridge to sit flat | It is designed to pivot, forcing it wrecks tuning and return-to-pitch | Seat it as designed, balance it with the springs |
| Forgetting the bridge ground wire | You get loud hum unless the strings are grounded | Trap the ground wire under the bridge before final mount |
| Cold solder joints | Dull, blobby joints fail later and cause dropouts | Heat the joint, feed a little solder, look for a shiny finish |
| Rushing the finish cure | Soft finish dents when you mount hardware | Let it cure hard before assembly |
| Overtightening screws into bare wood | Splits the wood or strips the hole | Drill pilot holes, snug firmly, do not force |
Pro tips
- Pro tip: Take photos of the wiring and the cavity before you disturb anything, so you have a reference if a joint comes loose later.
- Pro tip: Keep the tiny clamp and bridge screws in a magnetic dish or a labeled cup. Headless hardware has small parts that love to disappear.
- Pro tip: Do a full dry assembly (neck, bridge, one string) before finishing, so you catch any alignment surprise while it is still easy to fix.
- Pro tip: On a floating tremolo, tune from the low string up, then back down, a couple of times. The bridge settles as tension balances, and the first tuning is never the final one.
- Pro tip: Change strings one at a time on a floating bridge so the spring-and-string balance never fully lets go, which keeps setup close to where you left it.
- Pro tip: Get the string close to pitch by hand before locking the clamp. This single habit prevents most headless tuning headaches.
When you get stuck
Take your time, and do not force anything. Questions about a step? Comment below and we will help you right here. If a part looks wrong, is missing, or arrived damaged, email our support team at [email protected] with the email address you used for your purchase, your order number, and a photo, and the team will get you sorted out quickly. When your build is done, share it in the DIY Guitars category so the community can see what you made.
For more step-by-step videos, see the Guitar Kit World YouTube channel, and you can find this kit on its product page here: Headless Electric Guitar Kit.