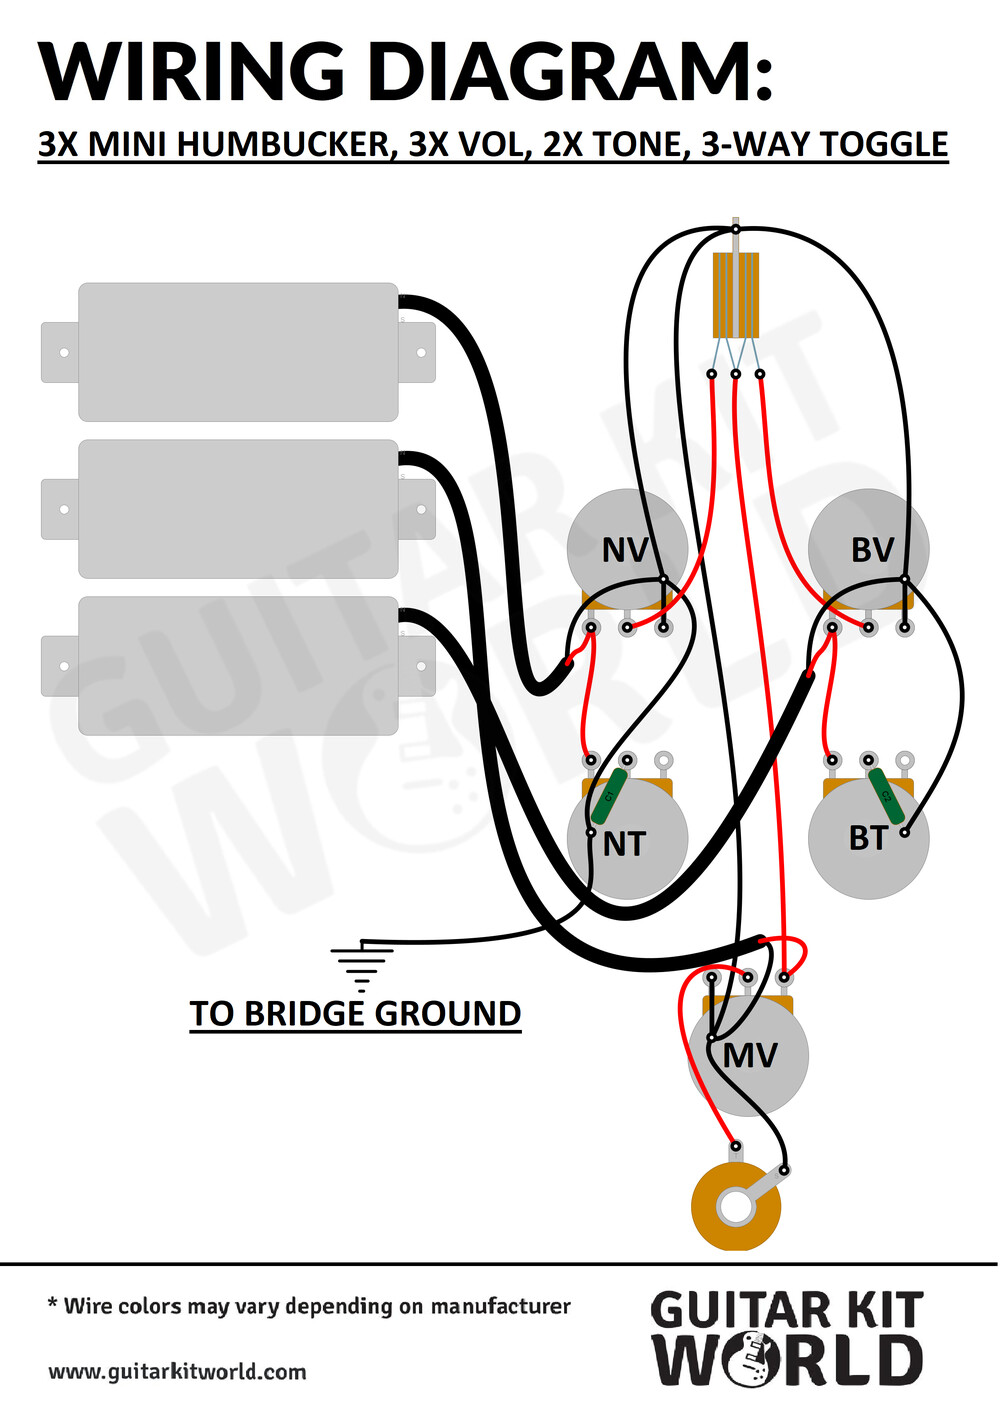
Click the image to download the diagram.
GKW kits that use this wiring
- 3-pickup short-scale: R325-RPRB-1
Tips
- Set the unused pickup volumes toward zero for cleaner switching between positions.
- The ground runs to the bridge, so make sure you have a clean bridge ground connection for a hum-free result.
- Wire colors may vary between kit batches, so match by position on the diagram, not by color.
- Some kits arrive with the harness pre-soldered. If yours does and it does not match this diagram, reply below with a photo before desoldering and we will confirm the correct path for your kit.
- Need soldering help? See our Electric Guitar Wiring guide for the basics: Electric Guitar Wiring for Kit Guitars — Guitar Kit World
Understanding Your 3 Mini-Humbucker Wiring: What the Toggle Actually Does
A companion guide to the 3x Mini-Humbucker Wiring Diagram (3 Volume, 2 Tone, 3-Way Toggle)
A wiring diagram shows you where every wire goes. It does not always make it obvious what actually happens when you flip the switch or turn a knob. If you have looked at this diagram and wondered exactly how the toggle and the three volumes work together, this is for you.
The layout
This wiring uses three mini humbuckers, three independent volume controls (one per pickup), two shared tone controls, and a 3-way toggle switch.
What each toggle position does
- Center position: All three pickups are active at once, each running through its own volume control. This is your full, blended sound, and it is also your mixing position, since each pickup’s level is independently adjustable.
- Flipped to one side: That side’s outer pickup (bridge or neck, depending on direction) plus the middle pickup are active together, sharing tone.
- Flipped to the other side: The opposite outer pickup plus the middle pickup are active together, sharing tone.
The key thing to understand: the middle pickup is always on
Across every toggle position, the middle pickup stays in the circuit. What changes is which outer pickup joins it. This is why the middle volume control is so useful for shaping your sound:
- Turn an outer pickup’s volume to zero, and you isolate the middle pickup on its own.
- Turn the middle volume to zero (with an outer pickup selected), and you isolate that outer pickup on its own.
- Leave all three up, and in the center position you get the full blend.
Because whichever pickups are active share the tone control for that position, the tone knob shapes whatever combination you have dialed in with the volumes.
Why this is worth experimenting with
Every combination of toggle position and volume levels gives you a genuinely different level, character, and output. Builders coming to this wiring for the first time often find it rewards some patient experimentation once it is wired up: run through each toggle position, then adjust the volumes within that position, and listen to what changes. There is more tonal range in this setup than the three-way toggle alone suggests.
A note for first-time builders
If you are new to soldering or new to electronics generally, this layout is very manageable. It typically comes to around two dozen solder joints, take your time, let the iron properly heat each joint before feeding solder, and test as you go.
This explanation was confirmed accurate by our technical team against the wiring diagram for this layout. If your kit’s wire colors differ from the diagram, match connections by position rather than color, colors can vary between batches/model.
Questions about your specific build? Reply in the community thread or reach out to our Builder Success team.
Questions about this wiring? Reply below and we will help.
Guitar body style names used in this content describe general design categories, not specific branded products. Guitar Kit World is not affiliated with or endorsed by any major guitar manufacturer. All trademarks are the property of their respective owners.