You are about to build a real, playable semi-hollow electric guitar with a double-cutaway contoured body, and you do not need to be a professional woodworker to do it. The semi-hollow body and its F-holes ask for a little extra care during prep and wiring, so take your time, read each section fully before you start it, and enjoy the process.
Difficulty: Intermediate (semi-hollow construction)
Build time: A few weekends, plus finish cure time
Kit: Semi-Hollow Double-Cutaway Contoured Guitar Kits
Deep-dive modules (universal references that go deeper than any single manual):
Finishing and painting · Neck installation · Wiring and soldering · Final setup
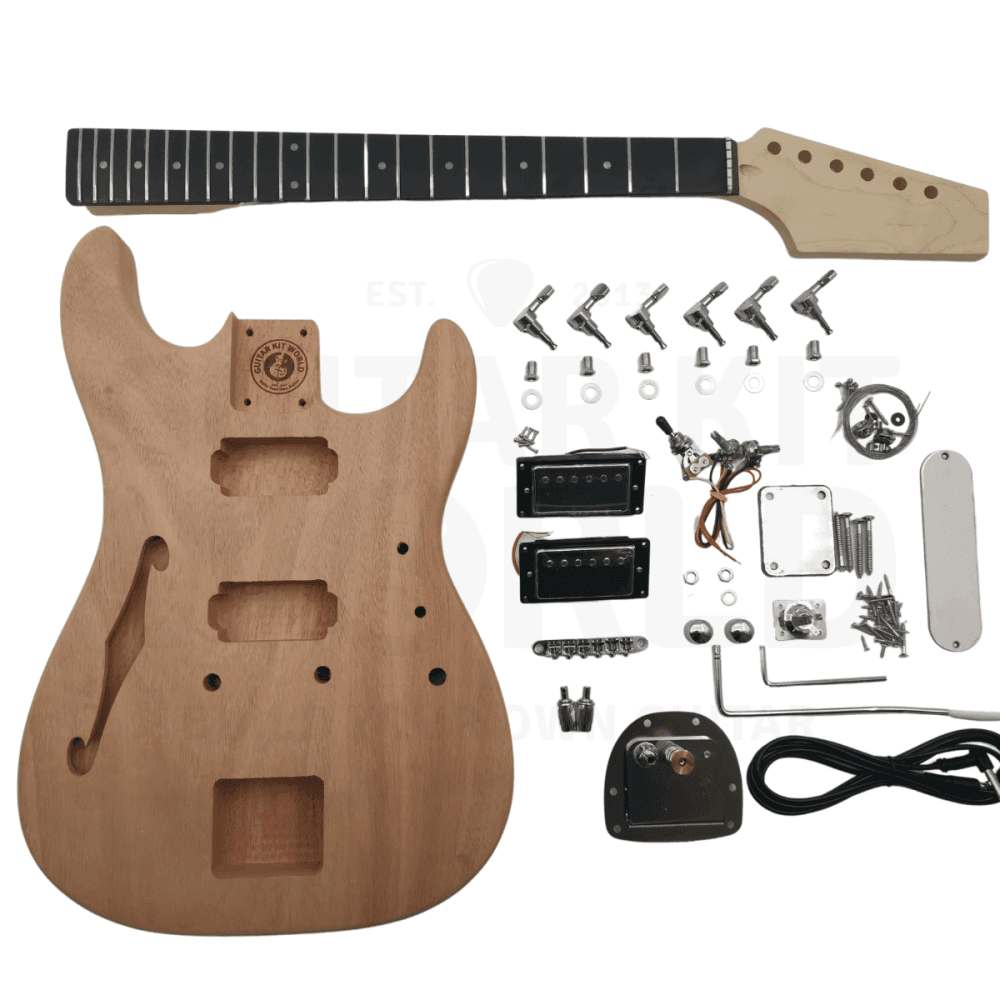

What’s in the box
Open the box and check off every part before you start. If anything is missing or damaged, email [email protected] before you go any further.
- Semi-hollow double-cutaway contoured body with F-holes
- Neck with truss rod (bolt-on)
- Neck plate, neck plate cushion, and four neck screws
- Neck pickup and bridge pickup
- Bridge with mounting posts and bushings
- Bridge ground wire
- A set of in-line tuners with their washers and bushings
- Volume pot, tone pot, tone capacitor, three-way pickup selector switch, and input jack
- Control cavity cover
- String trees
- Two strap buttons
- Control knobs
- Truss rod wrench and a set of assorted screws and washers
- A set of strings
Tools you’ll need
You do not need a full workshop. Here is what the build asks for.
- Electric drill and a set of drill bits
- Countersink bit
- Center punch or an awl to mark hole centers
- Coping saw or jigsaw, if you are shaping a paddle headstock
- Sanding block and sandpaper in a range of grits
- Steel ruler or straightedge, about 40 cm
- Calipers or a small ruler for measuring action and pickup height
- Phillips and flat-head screwdrivers
- Needle-nose pliers
- Soldering iron and solder, with a damp sponge for the tip
- Painter’s tape
- Craft knife
A drill press is nice for perfectly straight holes if you happen to have one, but it is not required.
Before you start
- Wear safety glasses whenever you cut, drill, or sand.
- Wear a dust mask when sanding, and wear gloves when you handle stain or oil finishes.
- Work in a well-ventilated space when you finish the body. The fumes can be harmful, so keep the air moving and take breaks.
- If you spray a finish, do not spray outdoors on a windy or dusty day, and do not leave the wet body outside to dry where dust can settle on it.
- A soldering iron gets very hot. Rest it in its stand, keep the cord clear of your work, and let each joint cool before you touch it.
Section 1: Initial inspection and preparation
Before you start sanding or applying finishes, make sure your kit is properly prepped. Semi-hollow bodies need a bit of extra care during the prep phase.
- Inspecting and prepping the body: Closely examine the wood for any deep scratches, machine marks, or dents from the factory.
- Dry fitting the neck: Slide the neck into the body pocket before doing anything else. It should be a snug, stable fit. If it is too tight or too loose, make adjustments before you apply any finish.
- Designing and cutting the headstock: If your kit features a paddle headstock, trace your desired design and carefully cut and sand it to shape. Leave at least 15 mm of wood between your last tuner hole and the edge of the headstock so it stays strong. A simple design done well looks better than a complex one done poorly.
- Grain filling: Depending on the wood type (like mahogany or ash, often used in semi-hollows), apply grain filler to the body and neck, working it into the pores. Let it sit for about 10 minutes, then wipe the excess off across the grain before it fully hardens. This ensures a perfectly smooth surface before finishing.
- Masking and sanding the body: Use painter’s tape to carefully mask off the F-hole cutouts and any body binding. Sand the body and neck through progressive grits, for example 120, then 180, then 240, until perfectly smooth. If you are staining bare wood, stop at around 400 grit, because sanding smoother than that keeps the stain from soaking in evenly.
Beginner watch-outs
| What to look for | Why it matters |
|---|---|
| Loose neck pocket | A wobbly neck leads to poor tuning stability and a “thin” sound. |
| Exposed binding or F-holes | Failing to tape off the F-holes or binding can lead to messy paint jobs that are very difficult to clean up later. |
| Skipping grain filler | If you have an open-pore wood, skipping grain filler will result in a dimpled, uneven finish rather than a smooth, glassy one. |
Section 2: Post-paint polishing and hardware installation
This section assumes you have completed your masking, staining, and clear-coating phases and the body is completely dry.
- Sanding and polishing the neck and body: Wet-sand the clear coat to remove any “orange peel” texture.
- The steel wool method (post-clear coat): Use super-fine (0000) steel wool in a gentle, circular motion to flatten and smooth the dried clear coat on the body and the back of the neck. Follow up by buffing with automotive cutting compounds to bring out a mirror-like, glossy finish.
- Protecting a painted finish: Before you drive any screw into a finished body, lightly chamfer the top edge of the hole with a countersink bit, or a larger drill bit turned by hand, so the finish does not chip around the screw.
- Installing the neck: Place the neck into the pocket, position the metal neck plate, and drive the long screws through the body and into the neck using a “cross” pattern so it sits perfectly flat.
- Installing the tuners: Slide the tuning pegs into the holes on the headstock. Use a straight edge to line up the back of the tuners so they are perfectly straight, then drill pilot holes and secure them. A good trick is to fit the first and last tuner, then lay the straight edge between them to line up the ones in the middle.
- Drilling pilot holes and installing strap buttons: Measure and mark the exact center point for the bottom and top horn. Pre-drill and install the buttons so your guitar hangs comfortably.
- Installing and grounding the bridge: Install the bridge posts and screws. Route the ground wire to the bridge anchor hole before pressing in the bridge studs so the strings will be properly grounded.
Beginner watch-outs
| Common issue | How to prevent it |
|---|---|
| Snapping tuner screws | Always drill a pilot hole. Rub a little candle wax or soap on the screw threads to help them glide into the dense headstock wood. |
| Forgetting the bridge ground | If you hammer in the bridge bushings without stripping and inserting the ground wire first, your guitar will hum uncontrollably. |
Section 3: Electronics and wiring
Wiring a semi-hollow can be slightly more challenging than a solid body, so take your time planning your soldering.
Pickup installation depends on the model you want to use. Please read the description and specifications of the guitar kit you order from guitarkitworld.com, as pickups come in different width and depth sizes.
- Wire color coding: Identify and route your wires using the standard color guide:
- Black: Used as the ground wire throughout the circuit (connecting the backs of pots, pickup selector ground, input jack ground, and the main bridge ground).
- Green: Used as the main output wire coming from the pickup selector switch to the active/hot lug of the input jack.
- Red: The active/hot wire for the neck pickup. This color coordinates with the wire coming from the neck position on the pickup selector.
- White: The active/hot wire for the bridge pickup. This color coordinates with the wire coming from the bridge position on the pickup selector.
- Installing two pickups: Route the pickup wires through the internal cavities of the semi-hollow body toward the control cavity. Mount the pickups securely into their respective routes.
- Connecting the electronics: Connect your volume pots, tone pots, and pickup selector switch according to the provided wiring diagram.
- Wiring and soldering: Solder the hot and ground wires to the input jack. Make sure all ground connections (including the bridge ground wire) are soldered to the back of the volume potentiometers to complete the circuit.
- Testing the pickups: Before you string the guitar or close up the cavities, plug the guitar into an amplifier. Gently tap the metal pole pieces of each pickup with a screwdriver while toggling the selector switch to make sure they are active and functioning correctly.
Beginner watch-outs
| Common issue | How to prevent it |
|---|---|
| No sound | Check the input jack; if the hot and ground wires are touching each other, the signal “shorts out.” |
| Loud buzzing or hum | Make sure the main bridge ground wire is securely soldered to the back of a potentiometer. |
Section 4: Final setup and playability
Now that your semi-hollow is assembled, these steps make it comfortable to play and keep it in tune.
- Tuning the guitar to concert pitch: Tune your strings (E-A-D-G-B-E). Gently stretch each string away from the fretboard several times and re-tune until they hold pitch.
- Adjusting neck relief: Fret the low E string at the 1st and last fret. Check the gap at the 8th fret. It should be roughly the thickness of a business card. Adjust the truss rod in small steps, no more than a quarter turn at a time, and let the neck settle between adjustments if it is too bowed or too flat.
- Adjusting the action: Raise or lower the bridge hardware to adjust string height. As a starting point, aim for about 2.4 mm on the low E side and about 1.6 mm on the high E side, measured at the 12th fret from the top of the fret to the bottom of the string. Lower action is easier to play, but too low will cause fret buzz.
- Checking intonation: If your bridge has adjustable saddles, tune each string open, then play the note at the 12th fret. If the fretted note is sharp, move that saddle back a little to lengthen the string. If it is flat, move it forward. Re-tune and check again until the open string and the 12th-fret note agree.
- Adjusting pickup height: Use a screwdriver to raise or lower the pickups. Aim for a balanced volume between the neck and bridge pickups. A good starting point is about 2.4 mm from the pole piece to the string when you hold down the last fret, then adjust to taste without letting the magnets pull too hard on the strings.
- Installing the string trees: As the final hardware piece, align and pre-drill pilot holes to install the string trees on the headstock. This gives you the proper string break angle and sustain over the nut.
- Sound testing the guitar: Plug it in and test every pickup position. Play notes up and down every string to check for any dead spots.
Beginner watch-outs
| Common issue | How to fix it |
|---|---|
| Strings keep going flat | Keep stretching the strings. It usually takes 3 to 4 rounds of stretching and re-tuning for new strings to fully settle. |
| Fret buzzing | Your action is likely too low. Raise the bridge slightly until the buzz disappears. |
Pro tips
- Dry fit first: Always test-fit the neck before grain filling or painting to make sure the pocket has not become too tight from finish build-up.
- Protect the hollow cavities: When sanding or polishing, be careful not to drop dust, water, or polishing compounds into the F-holes.
- Beware of steel wool fibers: Pickups attract steel wool fibers. If you used steel wool to polish your clear coat, meticulously clean the body before installing your pickups to prevent short circuits.
- The pilot hole rule: Kit screws are fragile. Never skip a pilot hole, whether you are installing a tiny tuner screw or a heavy-duty strap button. Wrap a little tape around the drill bit so you only go about two thirds of the screw’s length, and go shallower still in soft woods so the screw bites without splitting the wood.
- Mark your holes on tape: Put a strip of painter’s tape where you need to drill and mark the spot on the tape with a pen. The mark shows up clearly and the tape helps stop the bit from wandering.
- Keep the tone pot forward: In the tight semi-hollow cavity, mount the tone pot toward the front and the volume pot toward the back, so the wires are not stretched when you set the electronics into place.
- Stay in tune while you set up: Keep the guitar tuned to pitch during setup. The neck only sits at its true shape under full string tension, so any relief and action you set on a slack neck will be off.
When you get stuck
Take your time, and do not force anything. Questions about a step? Comment below and we will help you right here. If a part looks wrong, is missing, or arrived damaged, email our support team at [email protected] with the email address you used for your purchase, your order number, and a photo, and the team will get you sorted out quickly. When your build is done, share it in the DIY Guitars category so the community can see what you made.
For the complete walkthrough, follow the full build playlist. You can find everything about this kit on the Semi-Hollow Double-Cutaway Contoured Electric Guitar Kit page.