This guide walks you through how to build a single-cutaway set-neck electric guitar kit from the bare body to a set-up, playable instrument. It is a carved-top, solid-body design with a mahogany body, a carved maple top, a glued-in mahogany neck, two humbucker pickups, and a Tune-O-Matic bridge with a separate stopbar tailpiece. That combination gives you a warm, thick, sustaining tone, and it is one of the most satisfying DIY guitar kit assembly projects you can take on.
Two things make this build a step up from a bolt-on kit: the neck is glued in (set-neck construction), and the carved top rewards a careful finish. Neither is hard, but both are permanent once done, so read each section fully before you start it. Take your time. There is no rush, and the most common beginner mistake is hurrying.
Difficulty: Intermediate (set-neck glue-up)
Build time: A few weekends, plus finish cure time
Kit: Single-Cutaway Set-Neck Guitar Kits
Deep-dive modules (universal references that go deeper than any single manual):
Finishing and painting · Neck installation · Wiring and soldering · Final setup
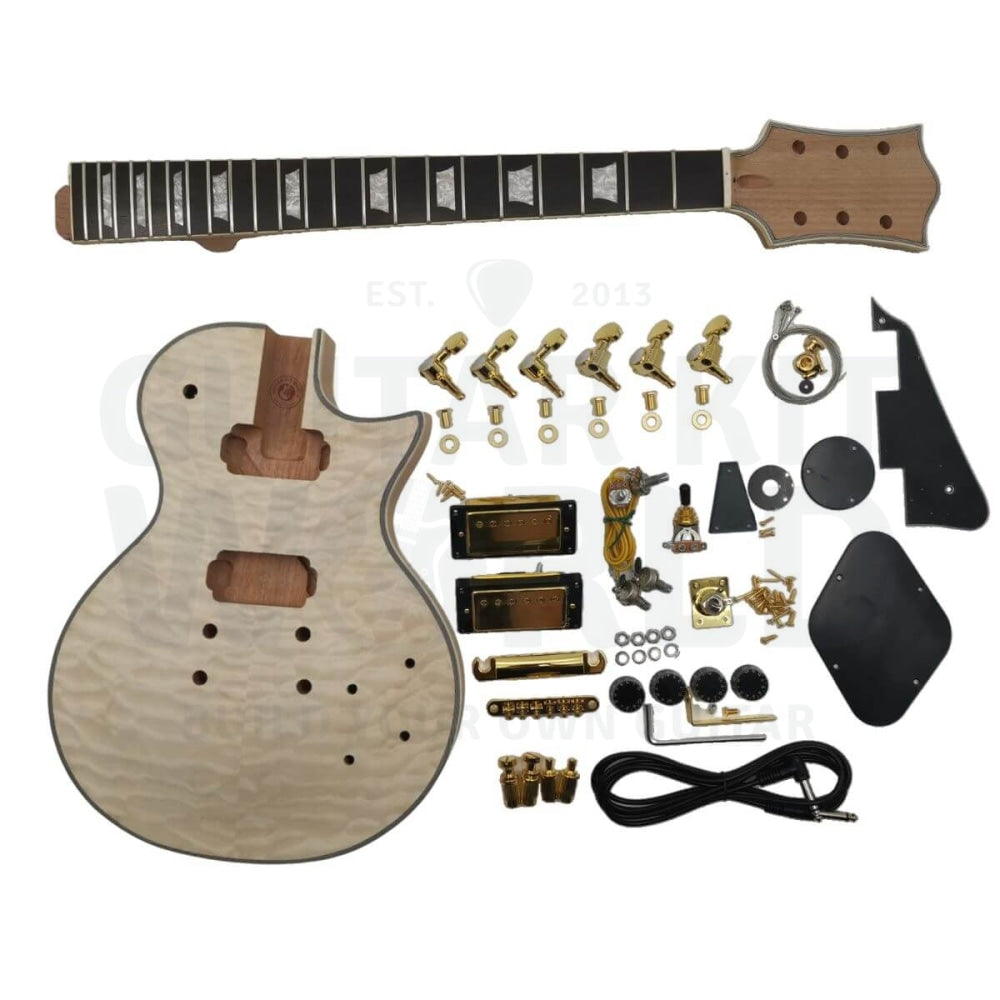
What’s in the box
Before you begin, lay everything out and check it against this list under good light. Inspect the body and neck for marks, dents, or glue stains while you do it. It is far easier to sort out a missing or damaged part now than halfway through the build.
- Solid mahogany body with a carved (arched) top, usually a maple top or a figured maple cap
- Mahogany set-neck with a rosewood or ebony fretboard, ready to be glued into the body
- Two humbucker pickups (a neck humbucker and a bridge humbucker) with their mounting rings
- Tune-O-Matic bridge (stud-mounted) and a separate stopbar tailpiece
- Bridge and tailpiece studs and bushings (one bushing carries the ground wire)
- Electronics: a three-way pickup selector (toggle switch), two volume pots, two tone pots, two capacitors, an input jack, and hookup wire
- Two volume knobs and two tone knobs
- Six tuners (three for each side of the headstock)
- Two strap buttons with small rubber pads
- Truss rod cover, front pickguard, and rear electronics cavity cover
- Truss rod hex wrench (Allen key)
- A set of strings
- A black ground wire for the bridge stud
- A bag of assorted screws and washers
Some single-cutaway kits use a bolt-on neck with a metal neck plate instead of a glued-in neck. This guide covers the glued-in set-neck. If your kit is a bolt-on, skip the glue-up in Section 2 and screw the neck plate on during hardware installation instead.
Tools you’ll need
None of these are exotic. Most are available at any hardware store.
- Glue-up: PVA wood glue, two clamps, and a scrap of timber to protect the body (a caul)
- Abrasives: Sandpaper in a range of grits (120, 180, 240, 400, and 600 to 800), plus a hard sanding block
- Finishing: Low-tack masking tape, grain filler, wood stain in your color, and a finish (spray lacquer, or an oil finish such as tung oil), plus steel wool, automotive polishing compound, and clean rags
- Hardware: A hand screwdriver set (phillips and flat), an electric drill with small bits, a center punch, needle-nose pliers, and a steel ruler 40 cm or longer
- Setup: An action ruler and feeler gauges are ideal, plus the hex wrench from your kit
- Electronics: A soldering iron, solder, and a damp sponge for the tip
- Safety: A dust mask (N95 for sanding, R95 for solvent-based finishing), safety glasses, and disposable gloves for stains and oils
- The threading trick: A short length of fishing line and a spare string, explained in Section 5
Pro tip: Never use a power driver on the small hardware screws. They are soft and fragile, and a drill will strip or snap them in an instant. Hand tools only for anything small.
Section 1: Inspection and preparation
Before you sand or glue anything, make sure the kit is complete and the wood is sound. This pre-flight check saves hours of frustration later.
- Full parts check: Open every bag and lay out all components. Match them against the list above so you know nothing is missing before you start.
- Body and neck inspection: Look over the mahogany closely for deep scratches, machine swirl marks, dents, or shiny spots of leftover glue. Paint and stain will not take evenly over glue residue, so note anything you need to sand out.
- Dry-fit the neck (no glue yet): Angle the heel of the neck into the body pocket and lower it in. Do not push it straight down, which can chip the neck edges. It should seat snugly and sit straight. This dry-fit is your safety net before the glue makes the joint permanent.
- Check the neck alignment: With the neck dry-fitted, sight down it toward the bridge. The center line of the neck should run straight to the center between the two bridge stud holes. If the neck can shift, mark the center of the heel and the center between the stud holes and line them up.
- Verify the scale length: Measure from the nut to where the bridge studs sit. On this style of kit that distance should be about 628 mm (24.75 inches). This confirms the neck and bridge are positioned correctly so the guitar will play in tune. If your kit’s spec sheet lists a different number, use that.
- Raise the grain: Lightly wipe the whole body and neck with a damp (not soaking) cloth. This makes loose wood fibers stand up. Once it dries you sand them flat, so the finish stays smooth and does not fuzz.
Beginner watch-outs
| What to look for | Why it matters |
|---|---|
| Missing or damaged parts | Contacting support now is much easier than stopping mid-assembly. Check before you sand or glue. |
| Hidden glue spots | Factory glue looks like shiny patches. Finish will not stick to them, so sand until they are gone. |
| A neck that does not seat | If the dry-fit is not clean and straight now, it will be locked in wrong after gluing. Fix the fit first. |
Section 2: Gluing in the set-neck
This is the step that defines a set-neck build, and it is the one to slow down for. Once the glue cures, the neck is part of the body for good, so get the dry-fit right in Section 1 first, then commit.
- Clean both surfaces: Brush out the neck pocket and wipe the neck heel so there is no dust. Glue bonds wood to wood, not wood to dust.
- Apply an even coat of glue: Using a brush, spread a nice even layer of PVA wood glue on both the walls of the neck pocket and the neck heel. You want full coverage, not a thick puddle.
- Seat the joint heel-first: Angle the heel in first, lower the neck, then press the whole neck firmly home. Confirm it is straight to the bridge one last time before you clamp, because this is your final chance to adjust.
- Clamp with even pressure: Place a scrap of timber over the body to protect it, then apply two clamps, one across the heel area and one under the body, to spread the pressure. Tighten until the joint pulls up snug.
- Wipe the squeeze-out: A little glue will squeeze out of the joint as you tighten. That is normal. Wipe it away with a warm, damp rag while it is still wet, especially anywhere near the top, so you do not have to sand it off later.
- Let it cure: Leave the neck clamped to cure. Overnight is the typical minimum for PVA glue, and 24 hours is safer. Follow the glue maker’s recommendation, and do not rush this.
Pro tip: Glue that soaked into the wood can hide until you finish, then show as a pale blotch. After the joint cures, lightly mist the area with water as if raising the grain. Any spot that refuses to absorb water is probably glue. Sand it away, but go gently near the top so you do not sand through a thin cap or veneer.
Beginner watch-outs
| Common issue | How to prevent it |
|---|---|
| A crooked neck | Check alignment to the bridge studs twice before clamping. After curing, it cannot be moved. |
| Glue blotches under the finish | Wipe all squeeze-out while wet, then do the water-mist test before finishing. |
| A starved joint | Cover both surfaces fully with glue. Too little glue makes a weak joint, too much just makes more mess. |
Section 3: Finishing the carved top and body
Finishing is where your guitar gets its personality, and the carved top is the centerpiece, so this section is worth doing patiently. Work in a well-ventilated space, wear your mask and glasses, and give every coat time to dry. The general order is: mask, grain-fill the mahogany, sand, stain the top, then build a clear finish and polish.
- Mask the cavities and fretboard: Use low-tack tape to cover the fretboard, the pickup cavities on the top, and the electronics cavity on the back. Keep stain and finish off the surfaces that need to stay clean.
- Grain-fill the mahogany: Mahogany is open-grained, so the back, sides, and back of the neck need grain filler to finish flat. Work the filler in with the grain first, then across it, pressing it into the pores with a rag. After about 20 minutes, wipe off the excess. A figured maple top usually does not need filling, so treat the top and the mahogany differently.
- Sand the filler back and level: Once dry, sand down to the surface of the wood but not into it, or you will open fresh pores. Start at 120 grit to knock back the filler, move to 180 to remove the 120 scratches, then refine to 240. Always sand with the grain. Sanding across it leaves scratches that show under the finish.
- Stain the top to pop the figure: If your kit has a figured maple top, a two-stage stain makes the grain jump. Rub a dark base stain firmly into the top, let it dry, then sand most of it back with 240 grit. The dark color stays down in the grain lines and accentuates the figure. Then apply your chosen color in a light wash coat first, let it dry, and build up to the depth you want. Fold the edges of your rag inward so loose fibers do not drag, and clean off dust between coats.
- Care for the carved edges: The carved top has curves and a rolled edge, so sand and wipe with a light touch there. It is easy to cut through a thin top or veneer on an edge or a peak, and you cannot put that wood back.
- Build your clear finish: For a spray finish, apply several light coats rather than one or two heavy ones. Light coats avoid runs and level better. Respray within the recoat window on your product, or wait the full cure time before sanding, and check that guidance on the can. For an oil finish, rub in a coat, then a second. On the final oil coat, let it sit about 15 minutes, then wipe off whatever the wood did not absorb while it is still tacky.
- Seal the neck for speed, not shine: Do not put a thick glossy finish on the back of the neck, or your hand will drag. A light coat of tung or linseed oil buffed to a matte feel keeps the neck fast.
- Steel-wool and polish: Once the finish is fully dry, rub it down with fine steel wool in a circular motion. It will dull the shine, which is expected. Then work automotive polishing compound in with one rag and buff it up with a clean second rag. The gloss comes right back and fine scratches disappear. Go over it a couple of times.
Pro tip: Dust is the number-one thing that ruins an otherwise beautiful finish. Clean the body thoroughly and remove all dust before every new coat, and keep the drying guitar away from sanding.
Pro tip: If you are spraying a solid color rather than a stain, lightly countersink the hardware screw holes first. A clean chamfer at the mouth of each hole stops the finish from chipping when you drive the screws later.
Beginner watch-outs
| Common issue | How to prevent it |
|---|---|
| Sanding through the top | Go light on the carved edges and peaks. Never power-sand a thin figured top or veneer. |
| Runs and drips | Spray several light coats, not a couple of heavy ones. Let each flash off before the next. |
| A blotchy stain | Raise and sand the grain first, keep coats even, and test your color on a hidden spot or scrap if you can. |
| A sticky neck | Keep the back of the neck to a thin matte oil, never a thick gloss. |
Section 4: Hardware installation
With the finish cured, you can start fitting metal. The golden rule here is simple: drill a pilot hole before every screw, and turn hardware screws by hand.
- Strap buttons: One button goes at the bottom of the body and one on the upper bout near the neck. Find the center line with a ruler, drill a pilot hole, fit the small rubber pad under the button, and drive the screw by hand.
- Tuners: Fit the six tuners, three per side, and hand-tighten just enough to hold position. Lay a steel ruler along them to check they are all straight, then mark and drill the small pilot holes, drive the screws by hand, and snug the top nuts or bushings.
- Ground the bridge before the studs go in: Feed the bare end of the black ground wire through the small side hole into the bridge stud cavity, so it will be pressed hard against the metal bushing when the stud seats. This metal-to-metal contact is what grounds the guitar and keeps it quiet, so do not skip it.
- Bridge and tailpiece studs: Press the stud bushings for the Tune-O-Matic bridge and the stopbar tailpiece into their holes. If a bushing is tight, lay a block of timber over it and tap gently with a hammer so you never dent the finish. Then thread in the studs and set the bridge and tailpiece on top.
Screw identification guide
Kit screws are soft and easy to strip, and each type has a job. Sorting them first saves a lot of second-guessing.
- Tuner screws: Very small and fragile, they hold the tuners to the back of the headstock. Always pilot-drill first, as they strip or snap easily in mahogany.
- Truss rod cover screws: The shortest screws in the bag, for the small cover just above the nut. Make sure you use the shortest ones. Longer screws can pierce through the back of the headstock.
- Strap button screws: Thicker, medium-length screws that pass through the metal button and its rubber pad into the body and heel.
- Pickup ring screws: Longer screws with a deeper thread for mounting the humbucker rings firmly into the body.
- Pickguard and cavity cover screws: Small, short screws for the front pickguard and the rear electronics cavity cover.
Pro tip: Wrap a piece of masking tape around your drill bit at about two-thirds the depth of the screw to make a depth stop. On mahogany, drill a pilot roughly two-thirds the thickness of the screw’s threads. This keeps the screw biting without splitting the wood or drilling clean through.
Beginner watch-outs
| Common issue | How to prevent it |
|---|---|
| Stripped or snapped screws | Always pilot-drill, wax the threads if the wood is dense, and drive by hand, never with a power tool. |
| A dented finish | Put a timber block between the hammer and the body whenever you tap in bushings. |
| A screw through the headstock | Use the shortest screws for the truss rod cover, and use a tape depth stop on your bit. |
Section 5: Wiring the electronics
This kit is a classic dual-humbucker layout: two volume pots, two tone pots, a three-way selector, and an input jack. Work calmly, one connection at a time, and it is very manageable even if you have never soldered.
- Soldering basics: Keep the tip tinned with a little solder so it does not oxidize. Tin your wires and the pot lugs too. Solder is not glue, it transfers heat, so hold the iron on the lug and wire for a moment to heat them, then feed in a small amount of solder to make the joint. Wipe the tip on a damp sponge now and then. A hot iron makes the cleanest joint, so let it come up to temperature, roughly 185 degrees C (365 degrees F) or more.
- Thread the selector with the fishing-line trick: Getting the toggle switch through its hole is the fiddliest part. Tie fishing line to the ball end of a spare string, tape the hole edges to protect the finish, and feed the string through the channel. Tie the line to the switch, keep the knot well above it so it pulls straight, and draw it gently into place. Thumb-tighten for now.
- Lay out the pots: Arrange the four pots in order before you wire, neck volume, neck tone, bridge volume, bridge tone. Laying them out to a template makes the wiring far easier to follow.
- Connect the pickups: Run each humbucker’s hot wire to the input lug of its volume pot, and solder each pickup’s ground to the back of that same pot. The bridge humbucker feeds the bridge volume, the neck humbucker feeds the neck volume.
- Wire color coding: Route your wires using the standard color guide, and always confirm against your kit’s own wiring diagram before you solder.
- Black: the ground wire throughout the circuit (backs of the pots, the selector ground, the jack ground, and the main bridge ground).
- Green: the output wire from the pickup selector to the hot lug of the input jack.
- Red: the hot wire for the neck pickup, matching the neck position on the selector.
- White: the hot wire for the bridge pickup, matching the bridge position on the selector.
- Attach the bridge ground: Solder the black ground wire coming from the bridge stud to the ground side of the circuit. This completes the ground and is the single most important connection for a hum-free guitar.
- Fit the knobs and jack: Press on the volume and tone knobs. For the input jack, thread its wires through with the same fishing-line-and-string method, keep the inner nut in place, set the plate over it, and screw it down.
Pro tip: Fishing line can slip when you drag a heavy pot through a cavity. Switch to fine cotton thread for pulling the pots, and save the fishing line for the lighter switch and jack.
Beginner watch-outs
| Common issue | How to prevent it |
|---|---|
| No sound | Check the input jack wiring. If the hot and ground touch, the signal shorts out. |
| Loud hum or buzz | Make sure the bridge ground wire is soldered and that the bare end is pressed against the stud bushing. |
| Cold solder joints | Heat the lug and wire first, then apply solder. A dull, lumpy joint usually needs reheating. |
Section 6: Final setup and testing
Setup is what turns an assembled guitar into one that plays beautifully. Treat these numbers as starting points. You can revisit them once you have played the guitar and know what you like.
- Tune to pitch first: Bring the guitar up to concert pitch (E A D G B E) before adjusting anything. The neck needs its normal string tension on it before you measure. Stretch new strings by hand and re-tune a few times, as they settle over the first several rounds.
- Neck relief (truss rod): Hold down the low E at the first fret and the last fret at the same time, then tap the string at the 12th fret. You want a tiny gap, about the thickness of a business card. If it sits dead flat, loosen the truss rod (counterclockwise) to add relief. Make small changes, an eighth to a quarter turn at a time, and re-check after each one. Never force a large adjustment.
- Action (string height): Measure at the 12th fret from the top of the fret to the underside of the string. A good starting point is 2.4 mm on the low E and 1.6 mm on the high E. Turn the two Tune-O-Matic bridge posts to raise or lower the whole bridge, tightening to lower and loosening to raise.
- Intonation: Compare the open string to the note fretted at the 12th fret, using the same picking force. If the 12th-fret note is sharp, move that saddle back, away from the neck. If it is flat, move the saddle forward, toward the neck. Work across all six strings with a tuner.
- Pickup height: Hold a string down at the last fret and measure from the top of the pole piece to the underside of the string. A good starting point is about 2.4 mm on the bass side and 2.0 mm on the treble side. Adjust the pickup mounting screws up or down. This one is very much down to how it sounds to your ear.
- Test everything: Plug in and check each selector position works, bridge, both together, and neck. Put the selector in the middle, turn both volumes to 10, and take your hands off the guitar. You should hear no hum. If you do, a ground connection has likely come loose. Then play every note up each string, listening for dead spots or fret buzz, and refine action and relief if you find any.
Beginner watch-outs
| Common issue | How to fix it |
|---|---|
| Strings keep going flat | Keep stretching. New strings usually need three or four rounds of stretching and re-tuning to settle. |
| Fret buzz | Your action or relief is likely too low. Raise the bridge slightly, or add a touch of relief. |
| Notes sound off higher up the neck | Intonation is off. Re-set the saddle positions at the 12th fret with a tuner. |
| Hum with hands off the strings | A ground is loose. Check the bridge ground wire and the joints on the backs of the pots. |
Pro tips
- Pro tip: Dry-fit the neck before you glue, and test-fit again after finishing so paint or finish build-up has not tightened the joint.
- Pro tip: Sand in order and never skip grits. Jumping straight to fine paper clogs it and forces you to overwork the wood.
- Pro tip: Go light on the carved top and its edges. It is easy to sand through a thin figured cap, and you cannot replace that wood.
- Pro tip: Spray several light coats instead of one or two heavy ones. Light coats level better and avoid runs.
- Pro tip: Keep the back of the neck to a thin matte oil, never a thick gloss, so your hand stays fast.
- Pro tip: Never skip a pilot hole, and never drive small hardware screws with a power tool. A tape depth stop on the bit keeps you from drilling through the headstock or body.
- Pro tip: Tin the iron, the wires, and the lugs before you solder, and let the iron get properly hot for clean joints.
- Pro tip: After you have played the guitar for a while, come back and refine the relief, action, and intonation. Setup is not one-and-done, and the neck settles as it beds in.
When you get stuck
Take your time, and do not force anything. Questions about a step? Comment below and we will help you right here. If a part looks wrong, is missing, or arrived damaged, email our support team at [email protected] with the email address you used for your purchase, your order number, and a photo, and the team will get you sorted out quickly. When your build is done, share it in the DIY Guitars category so the community can see what you made.
Find everything you need on the kit page, and check your kit’s spec sheet on the product page for its exact scale length, wiring diagram, and hardware: Single-Cutaway Set-Neck Guitar Kit.