This guide shows you how to build a superstrat electric guitar kit from the box to the first chord. A superstrat is a modern, contoured, double-cutaway solid-body guitar with a bolt-on neck, at least one humbucker, and often a locking tremolo. It is a fast, comfortable shape built for players who like low action and expressive whammy work. This is a thorough, beginner-friendly walkthrough of DIY guitar kit assembly, and while we rate it Intermediate because of the locking hardware, you do not need to be a professional woodworker to finish it. Take your time. There is no rush, and the most common beginner mistake is hurrying.
Difficulty: Intermediate
Build time: A weekend or two of work, plus finish cure time
Kit: Superstrat Guitar Kits
Deep-dive modules (universal references that go deeper than any single manual):
Finishing and painting · Neck installation · Wiring and soldering · Final setup
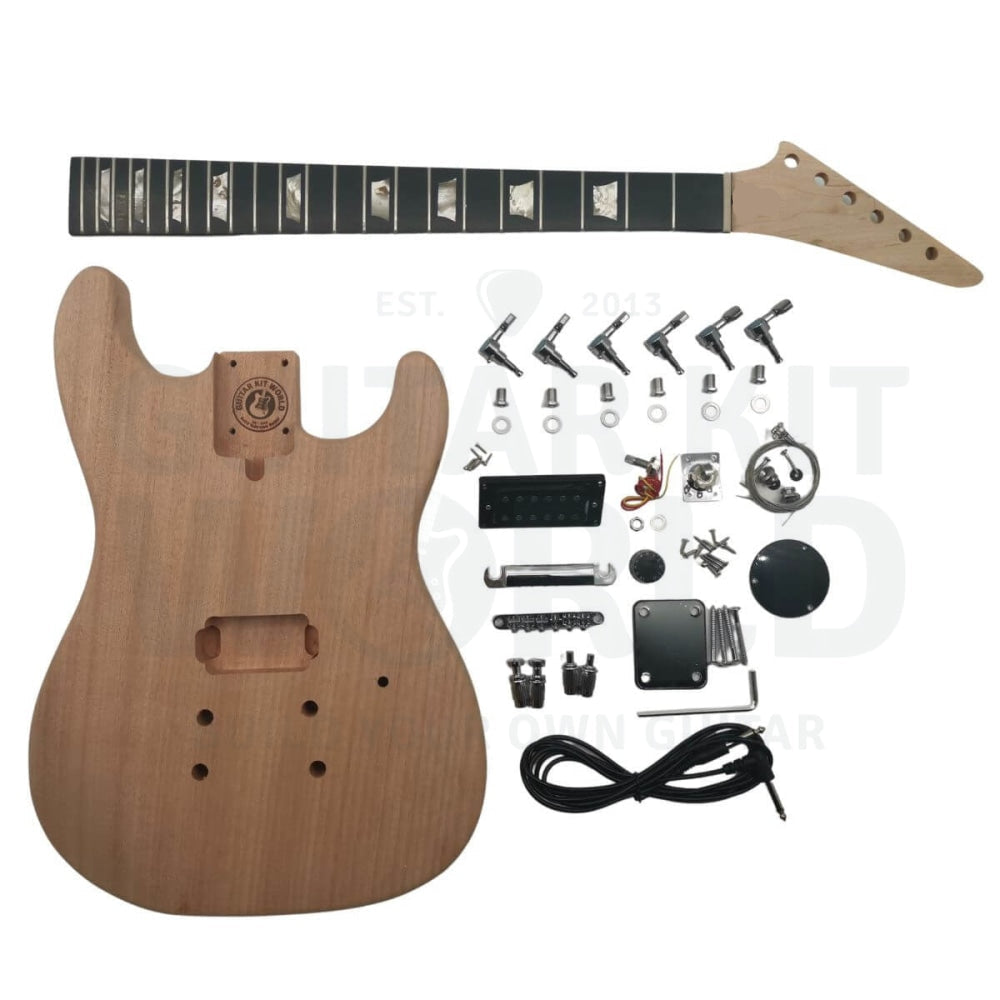
What’s in the box
Open every bag and lay everything out before you begin. Match each item against your kit’s own part list, and if anything is missing or damaged, contact support before you go further.
- One prepped superstrat body, contoured and double-cutaway, solid wood
- One completed bolt-on neck with a 6-in-line headstock
- Two strap buttons
- Six 6-in-line tuners
- The bridge system for your kit: either a double-locking tremolo, or a Tune-O-Matic bridge with a stopbar tailpiece (check which one your kit ships with)
- One or more humbucker pickups (your kit’s wiring diagram shows the exact configuration)
- One volume potentiometer and one volume knob
- One input jack
- A hex wrench for the truss rod
- Assorted screws and washers
Tools you’ll need
You do not need a professional workshop. Most of these are common household or hobby tools.
- Electric drill and a set of drill bits
- Countersink drill bit
- Soldering iron
- Steel ruler, at least 40 cm long
- Hard sanding block
- Center punch
- Screwdrivers, large and small, in both Phillips and flathead
- Needle-nose pliers
- Electric jigsaw or coping saw (optional, only if you plan to shape the headstock)
- Sandpaper in 180, 240, and 400 grit
- Masking or painter’s tape
- A clip-on or pedal tuner for the final setup
- Safety gear: rated safety glasses, an N95 or R95 mask, and disposable nitrile gloves
Section 1: Inspect and prepare the body and neck
Before you sand or paint anything, check that your kit is complete and the wood is sound. This quick inspection saves hours of frustration later.
- Inspect under good light: Look over the whole body and neck for dents, deep scratches, and shiny glue residue. Glue residue matters most on binding or veneer-top areas, because a finish will not stick to it. Address any problem spots before you start sanding.
- Raise the grain: Wipe the body and neck with a lightly damp cloth, or with denatured alcohol, to make the loose wood fibers stand up. Let it dry fully, then sand those fibers flat. This one step keeps your finish from turning fuzzy later.
- Sand in sequence: Start with 180-grit sandpaper over the entire body to remove factory marks, then move to 240-grit. Always sand with the grain, never across it, because cross-grain scratches show up under paint.
- If you are staining the wood directly: Sand no finer than 400-grit. If the surface is too smooth, the stain cannot soak in evenly.
- Mask the fretboard: Cover the front of the neck with masking tape to protect the frets and fretboard from dust, oil, and finish while you work.
Section 2: Finish the body and neck
Finishing is the stage that most changes how your guitar looks, and it is the stage where safety matters most. Read this section fully before you open any can. This is a complete, self-contained finishing routine you can follow for any solid-body kit.
Set up a safe workspace
- Ventilation first: Finish only in a well-ventilated area. Paint and solvent fumes are genuinely dangerous, so never spray in a closed room.
- Eyes: Wear rated safety glasses. Everyday prescription, reading, or sun glasses are not protection.
- Skin: Wear disposable nitrile gloves when handling stains and oil finishes.
- Lungs: Wear an N95 dust mask while sanding. Step up to an R95 particle mask while spraying solvent-based finishes. Water-based finishes may allow an N95 for both stages, but check the product’s own safety sheet.
Apply the finish
The exact products are up to you, but the order is the same for most kits.
- Seal, then build up thin coats: Whether you stain, paint, or use an oil finish, work in thin, even coats rather than one heavy coat. Thin coats dry evenly and are far less likely to run.
- Let each coat cure: Follow the drying and recoat times printed on your finish product. Rushing between coats is the most common cause of a soft or cloudy finish.
- Level between coats if needed: For a glossy build, lightly knock down each cured coat before the next, following your product’s guidance.
- Cure before assembly: Let the final finish harden fully before you install hardware. A finish that feels dry can still be soft underneath.
Beginner watch-outs
| Common issue | How to prevent it |
|---|---|
| Fuzzy or rough finish | Raise and sand the grain before finishing, and let each coat cure fully. |
| Runs and drips | Spray or brush thin coats, not one thick one. |
| Finish will not stick in spots | Sand out all glue residue first, especially near binding or a veneer top. |
| Fumes or dust headache | Improve ventilation and wear the correct mask. Stop if you feel unwell. |
Section 3: Dry-fit the neck and check alignment
A superstrat has a bolt-on neck, so the neck-to-body fit is one of the most important things to get right. Do this before final assembly.
- Dry-fit the neck: Slide the neck into the body pocket. Push the heel in gently first, then press the neck down flat. Leading with the heel reduces the risk of chipping the pocket edges. The neck should sit snug with very little sideways movement.
- Handle a loose or tight pocket: If there is a gap on either side of the heel, shim it with a thin sliver of scrap wood, or fill a smaller gap with wood filler, and do this before you finish. If the pocket is too tight, note where it binds so you can sand it lightly.
- Check the scale length: Scale length is the playing length of the string. Measure from the edge of the nut to the center of the 12th fret, then double that number. Superstrat kits are commonly built around a 24.75 in (629 mm) scale, but scale length varies by kit, so confirm the exact figure on your kit’s product page. If your doubled measurement is off by a couple of millimeters, the individual bridge saddles can compensate later when you set intonation.
- Check the neck angle: Lay your steel ruler flat along the fretboard so it extends over the bridge area. With the bridge sitting flat on the body, the ruler should pass just above the saddles. That tells you the neck angle and bridge height will let you set a comfortable action.
Beginner watch-outs
| What to look for | Why it matters |
|---|---|
| Loose neck pocket | A wobbly neck causes poor tuning and a thin sound. Shim or fill before finishing. |
| Scale length far off | Small errors intonate out at the saddles, but a large error means the neck or bridge is misplaced. Recheck your measurement. |
| Ruler sits below the saddles | The neck may be seated wrong, or the bridge is set too high. Recheck before drilling anything. |
Section 4: Drill pilot holes and install the hardware
Every screw that goes into this guitar needs a pilot hole. Kit screws are easy to snap, and the wood on a solid-body kit is often soft, so a good pilot hole is what keeps a screw from stripping or splitting the wood.
The pilot hole method
- Mark the spot: Place a small piece of masking tape where the hole goes and mark the exact center with a pen. Press a center punch through the tape to make a small starting indentation so the drill bit cannot wander.
- Pick the bit: Choose a drill bit about two-thirds the thickness of the screw’s threads. This lets the threads bite while the pilot hole carries the shank.
- Set the depth: Wrap a flag of masking tape around the bit to mark your stop depth, at roughly two-thirds of the screw’s length. On soft woods like mahogany and basswood, go shallower, less than a third of the screw depth, because soft wood grips more and splits more easily.
- Drill straight: Keep the bit perpendicular to the surface. A drill press makes this easy, but a steady hand and a square sightline work too.
- Chamfer the mouth: Touch each hole with a countersink bit to bevel the edge. This is especially important under a solid color finish, so the paint does not chip when the screw seats.
Install the hardware
- Tuners: Fit the six 6-in-line tuners into the headstock holes. Use a straight edge to line up the back of the tuners so they sit perfectly straight before you secure them.
- Strap buttons: Measure and mark the center point for the bottom strap button so the guitar hangs straight, then pilot-drill and install both buttons.
- Bridge and tremolo: Mount your bridge system. If your kit uses a Tune-O-Matic bridge with a stopbar, set the posts so the bridge sits flat and level. If your kit uses a double-locking tremolo, mount the base so it can pivot freely (Section 7 covers the locking-tremolo setup in detail).
Beginner watch-outs
| Common issue | How to prevent it |
|---|---|
| Snapped or stripped screw | Always pilot-drill. Keep the pilot shallow in soft mahogany or basswood. |
| Angled or wandering hole | Center-punch first, then drill straight, ideally with a drill press. |
| Chipped paint around a screw | Countersink the hole edge before driving the screw. |
| Crooked tuners | Line the tuners up against a straight edge before tightening. |
Section 5: Wire the electronics
A superstrat’s electronics can be as simple as one humbucker into one volume control, which is the classic hot-rod layout. Your kit includes a wiring diagram, and that diagram is the authority for your exact wire colors and connections. Follow the colors shown on it rather than any generic assumption.
Soldering basics
- Your setup: An entry-level soldering iron is fine. Your kit includes plenty of solder, and a damp sponge lets you keep the iron tip clean.
- Tin the tip: Keep a light coat of solder on the hot iron tip at all times. This prevents oxidation and helps heat flow into the joint.
- Preheat the joint: Heat the lug or component for a moment so the solder is drawn onto it, rather than sitting in a blob on the iron. A properly heated joint looks shiny and smooth, not dull and lumpy.
- Practice first: If you have never soldered, practice on a scrap wire or an old component before you touch the real parts.
Wire it up
- Follow your diagram: Connect the humbucker, the volume potentiometer, and the input jack exactly as your kit’s “one humbucker, one volume” diagram shows. If your kit has more than one pickup, the diagram shows the selector wiring too.
- Ground everything to one point: Ground connections keep the guitar quiet. Make sure the pickup, the pot, the jack, and the bridge or tremolo all tie to the circuit ground as your diagram indicates.
Soldering safety
Solder does not melt until it reaches about 185°C (365°F), and a soldering iron can reach 392°F to 896°F (roughly 200°C to 480°C) in some cases. Treat the tip as always hot, rest the iron in its stand between joints, and work over a heat-safe surface.
Beginner watch-outs
| Common issue | How to prevent it |
|---|---|
| No sound | Recheck the jack wiring and confirm the hot and ground wires are not touching. |
| Loud hum or buzz | Confirm the bridge or tremolo is grounded to the circuit as the diagram shows. |
| Dull, cracked solder joint | Reheat it. A cold joint is weak and can go intermittent. Aim for a shiny joint. |
| Burned fingers | Hold parts with tape, pliers, or a helping-hand tool, never your fingers. |
Section 6: String up and set up the guitar
Setup is what turns an assembled kit into a guitar that plays in tune and feels good. Work through these in order, and keep the guitar tuned to concert pitch every time you check a measurement, because string tension changes everything.
Adjust the neck relief
Relief is the small inward bow the neck needs so the strings have room to vibrate without buzzing.
- Check it: Hold down the string at the 1st fret and the last fret at the same time, on the low E. Tap the string lightly over the 12th fret. If the string sits hard against the fret, you need more relief. If it floats well above the fret, you have too much.
- Adjust it: Use the hex key from your kit. Turning counter-clockwise loosens the truss rod and adds relief. Turning clockwise tightens the rod and flattens the neck. Move only an eighth to a quarter turn at a time, retune to pitch, and check again before the next adjustment.
Set the string action
Action is the string height measured from the top of the 12th fret to the underside of the string.
- Starting heights: A good starting point is about 2.4 mm on the low E side and 1.6 mm on the high E side. The difference accounts for the thicker low strings needing more room.
- Adjust it: With the guitar in tune, use the small key from your kit to turn the individual saddle posts. Counter-clockwise lowers the saddle, clockwise raises it. Lower action is easier to play, but too low and the strings buzz against the frets.
Intonate the guitar
Intonation keeps the guitar in tune as you play up the neck.
- Check it: With the guitar in standard tuning, compare the open string to the note fretted at the 12th fret, which should be exactly one octave higher. Bass strings need extra length because of their mass, which is why the saddles usually step back toward the bass side.
- Adjust it: Use the intonation screw at the back of each saddle. If the 12th-fret note is sharp, lengthen the string (turn counter-clockwise to move the saddle back). If it is flat, shorten the string (turn clockwise to move the saddle forward). Retune and recheck after every change.
Set the pickup height
- Starting height: Aim for about 2.4 mm from the top of the magnetic pole piece to the underside of the string, measured while you hold the string down at the last fret. Match the height across each humbucker so the output stays balanced.
- Fine-tune by ear: Pickup height is partly personal. Raising a pickup adds output but can pull on the strings, so adjust to the tone and volume you like.
Beginner watch-outs
| Common issue | How to fix it |
|---|---|
| Fret buzz | Raise the saddles slightly, or add a touch more relief. |
| Strings choke out on bends | Your action is too low. Raise the saddles a little. |
| Notes sharp or flat higher up | Reset intonation at the 12th fret with a tuner. |
| Truss rod feels stiff | Stop. Move only small amounts, retune between turns, and never force it. |
Section 7: Set up a double-locking tremolo and locking nut
Many superstrat kits ship with a double-locking tremolo and a matching locking nut. If yours does, this section covers the extra steps that system needs. If your kit uses a Tune-O-Matic bridge with a stopbar instead, you can skip this section, because Section 6 already covers your setup.
- Balance the floating bridge: A double-locking tremolo floats on knife edges, held between string tension pulling one way and the springs in the rear cavity pulling the other. Adjust the spring claw in the back cavity until the bridge plate sits level and parallel with the body while the guitar is tuned to pitch. Tightening the claw pulls the bridge down, loosening it lets the bridge rise.
- Tune with the nut unlocked first: Leave the locking nut pads open while you do your first full tuning, relief, action, and intonation. Everything moves more freely with the nut unlocked.
- Lock the nut: Once the guitar is tuned and set, tighten the locking-nut pads evenly over the strings. Locking the nut usually nudges the tuning slightly sharp, which is normal.
- Fine-tune at the bridge: After the nut is locked, use the fine tuners on the bridge to bring each string back to pitch. The fine tuners are your everyday tuning once the nut is locked.
- Set intonation at the saddles: Intonation on a double-locking tremolo is set by moving each saddle forward or back, the same octave check at the 12th fret as in Section 6. Detune and relieve string tension before you loosen a saddle so it does not shift under load.
- Change strings one at a time: Because the bridge floats, swap strings one at a time to keep tension roughly balanced, so the bridge does not dive and pull your other strings out of tune.
Beginner watch-outs
| Common issue | How to fix it |
|---|---|
| Bridge pulls up off the body | Tighten the spring claw in the back cavity to add spring tension. |
| Bridge dives into the body | Loosen the spring claw to reduce spring tension. |
| Goes sharp after locking the nut | Expected. Bring it back to pitch with the fine tuners. |
| Whole guitar drifts out after one string change | Change strings one at a time so the floating bridge stays balanced. |
Pro tips
- Pro tip: Practice soldering on a scrap wire before you touch the real components. A few practice joints save a lot of grief.
- Pro tip: Keep the guitar tuned to concert pitch every time you check relief, action, or intonation. Tension changes the reading.
- Pro tip: On soft woods like mahogany and basswood, keep pilot holes shallow, less than a third of the screw depth, so the screw does not blow through or strip.
- Pro tip: Shim a loose neck pocket with a sliver of scrap wood, or fill a small gap with filler, before you finish, not after.
- Pro tip: Chamfer each screw hole with a countersink bit, especially under a solid color finish, so the paint does not chip when the screw seats.
- Pro tip: Raise the grain with a damp cloth or denatured alcohol, let it dry, then sand flat for a smoother, fuzz-free finish.
- Pro tip: After a few days of playing, recheck your setup. A new neck and new strings settle in, and a small retune of relief and intonation is normal.
When you get stuck
Take your time, and do not force anything. Questions about a step? Comment below and we will help you right here. If a part looks wrong, is missing, or arrived damaged, email our support team at [email protected] with the email address you used for your purchase, your order number, and a photo, and the team will get you sorted out quickly. When your build is done, share it in the DIY Guitars category so the community can see what you made.