This guide walks you through how to build an offset electric guitar kit, from bare parts to a set-up, playable instrument. An offset guitar has an asymmetric, offset-waist solid body that balances comfortably whether you play sitting or standing. Most offset kits pair a bolt-on neck with single-coils or humbuckers, a floating tremolo, and a Tune-O-Matic-style bridge on posts. This is a DIY guitar kit assembly walkthrough written for first-time builders, and it doubles as a reference you can return to at each stage. You do not need to be a professional woodworker to build one. Take your time, read each section fully before you start it, keep your work area clean, and enjoy the process.
Difficulty: Intermediate
Build time: a weekend of hands-on work, spread across one to two weeks so each finish coat can fully cure
Kit: Offset Guitar Kits
Deep-dive modules (universal references that go deeper than any single manual):
Finishing and painting · Neck installation · Wiring and soldering · Final setup
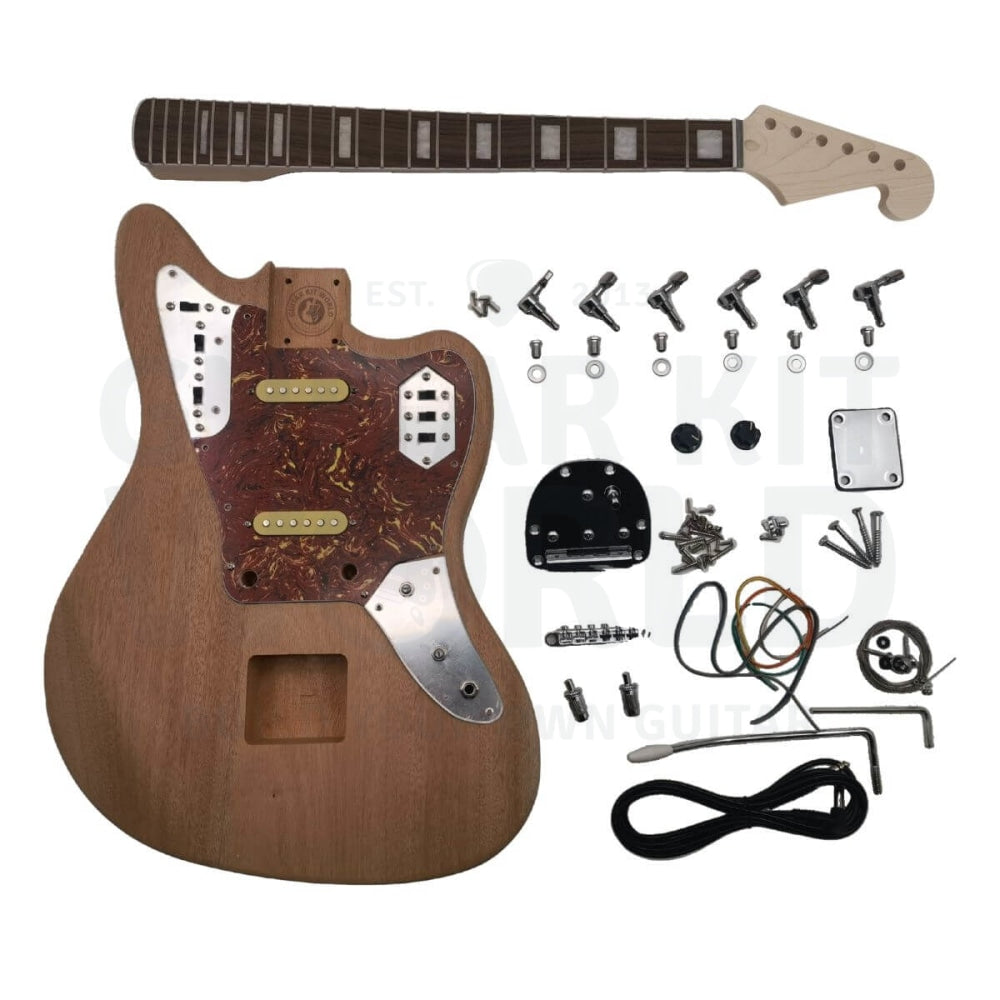
What’s in the box
Kits vary, so check these items against your kit’s packing list on the product page. A typical offset kit includes:
- Offset-waist solid body, routed for the pickups, controls, and neck pocket
- Bolt-on neck with fretboard, frets, and truss rod
- Neck plate and neck bolts
- Set of tuning machines, with bushings or ferrules and screws
- String tree or string retainer
- Tune-O-Matic-style bridge with two posts and bushings
- Floating tremolo tailpiece and arm
- Neck and bridge pickups (single-coils or humbuckers)
- Pickup selector switch (3-way or 5-way, depending on the layout)
- Volume and tone potentiometer(s) and capacitor(s)
- Output jack
- Control plate or pickguard
- Control knobs
- Two strap buttons
- Truss rod cover
- Hookup wire and a separate bridge ground wire
- Nut, often pre-cut
- Bag of assorted screws
- Set of strings
If anything looks missing or wrong, stop and email [email protected] before you go further.
Tools you’ll need
- Two timber clamps (mainly for set-neck work and glue-ups)
- Electric jigsaw or coping saw (only if you shape the headstock)
- Steel ruler, at least 40 cm long
- Hard sanding block
- Center punch
- Electric drill with an assortment of bits
- Large and small screwdrivers (Phillips and flat-head)
- Needle-nose pliers
- Soldering iron
- Rubber mallet (for seating bushings)
- Damp sponge (to clean the soldering iron tip)
- Sandpaper in several grits (180, 240, 400, and 600 to 800 for finishing)
- Safety gear: N95 dust mask for sanding, R95 particle mask for finishing, eye protection, and gloves. Always work in a well-ventilated space, because paint and solvent fumes are dangerous.
Section 1: Inspect your kit and dry-fit the neck
Lay out every part and inspect the body and neck before you touch a tool. Look for large dents that would need filling, deep scratches that need sanding out, and any glue residue or glue stains, which stop the finish from soaking in evenly. Glue stains matter most on bound or veneer tops.
Now dry-fit the neck. Push the heel gently into the neck pocket, then press the neck flat into the pocket. Seating it this way lowers the risk of chipping the finish later.
While the neck is in place, run three checks:
- Scale length. Measure from the edge of the nut nearest the fretboard to the center of the 12th fret, then double that number. That is your scale length. If it looks off by a few mm, do not worry. The bridge sits at a slight angle to compensate for the heavier bass strings, and the saddles fine-tune everything during setup.
- Alignment. Mark the center of the neck heel and line it up with the centers of the pickup and bridge routes. If there is a gap on either side of the neck, or the neck shifts sideways in the pocket, cut thin shims from scrap wood to snug it. Fill or shim any gaps before you finish.
- Neck angle. Lay a steel ruler flat along the fretboard toward the bridge. With the neck seated flat, the ruler should pass just above the bridge saddles at their lowest setting.
Section 2: Shape the headstock (optional)
Skip this section unless you want a custom headstock shape.
Sketch your ideas, then transfer the one you like onto full-size paper. Leave a margin of at least 15 mm between the last tuning hole and the edge of the headstock, or the wood around the tuners becomes structurally weak. Glue the design to card or thin timber to make a template, cut it out with a coping saw, jigsaw, or bandsaw, and sand the edges smooth.
Clamp the template to the headstock and trace the outline. Cut the new shape with the template as your guide, keeping the saw vertical and protecting the neck as you work. Sand the edges until they are as smooth as the rest of the body and neck.
Pro tip: Use a card template rather than timber. It is far easier to cut and adjust, and you only commit to wood once you are happy with the shape.
Section 3: Sand the body and neck
Sanding is what makes a finish look professional, so do not rush it.
- Start at 180 grit to level the surface and remove machine marks.
- Move to 240 grit to refine it.
- If you are staining the bare wood, you can go up to 400 grit, but no finer. Sanded too smooth, the wood stops taking stain.
After the 240-grit pass, raise the grain: wipe the wood with a little denatured alcohol or water, let it dry, and sand it flat again. The grain usually only raises once. Remove every trace of sanding dust, and if you used steel wool, pick out all the loose fibers before you finish.
Section 4: Fill the grain
Open-pore woods such as oak and mahogany need grain filler, or the finish will never lie flat. Basswood is optional. Filler comes in solvent, water, and oil-based versions, and pre-tinted fillers accentuate the grain.
- Mix the filler to a workable paste, following the product instructions.
- Rub it in with a clean rag, working with the grain first, then across the grain with pressure to pack the pores.
- Wait about 10 minutes, then wipe the excess with a damp rag.
- Once dry, sand back with 120 to 240 grit until you reach a level surface with filled pores. Do not go coarser, or you will open new scratches.
- Repeat if any pores remain.
Pro tip: Fill the grain before you stain. Color lands far more evenly on a filled, level surface, and a tinted filler makes the grain pop.
Section 5: Mask before you finish
Before any finish goes on, mask the areas that must stay clean:
- The neck pocket and all body cavities, whenever you spray
- The tuning peg holes on the headstock
- The bridge and tailpiece post holes
- The truss rod
- The fretboard, when you spray the back of the neck
- Any binding, if it has cracks. Masking keeps color out of cracked binding, which is otherwise impossible to restore. If the binding is sound, you can scrape it clean after spraying instead.
Section 6: Finish the body and neck
This is the stage that most rewards patience. Whether you spray or wipe on an oil finish, the same principles apply.
- Thin coats win. Several lighter coats look better and cure more reliably than one or two heavy coats.
- Respect the daily limit. Do not lay down more than three coats in a day, or the first coats may fail to cure.
- Mind the respray window. Recoat within about one hour, or wait a full 24 hours and scuff the surface with 600 to 800 grit before the next coat.
- Spray order. Do the sides first, then the front and back, so the overspray from the sides is covered.
- Keep it clean. Work in a relatively dust-free space, and clean the cavities thoroughly after sanding. Dust settles in the cavities, and when you turn the guitar over it becomes airborne and lands on wet finish.
- Dry indoors. Hang the body in a cool, dry place. Never dry it outdoors, where it will attract dust and insects.
- Stay in one system. Use the same brand and type of product for your sealer, color, and clear coats. Mixing brands or types can cause the finish to lift or fail to bond.
- If you stain and the wood has not absorbed it after about 10 minutes, wipe off the excess.
Pro tip: For a bolt-on build, screw a scrap-wood handle into the neck pocket so you can hold and hang the body without touching wet finish.
Section 7: Install the tuners and truss rod cover
Once the finish has fully cured, start on the neck hardware.
Drilling pilot holes (you will do this often): mark the spot with a strip of masking tape, dent the center with a center punch so the bit cannot wander, and drill a pilot hole about two-thirds the thickness of the screw’s threads and roughly two-thirds the screw’s length deep. Too small and the screw can split the wood or snap. Too large and it will not grip.
Fit the tuning machines to match your headstock, whether it is 6-in-line or three-a-side. Seat the bushings or ferrules in the face, fit each tuner from the back, and line them up square with a steel ruler. Then drill pilot holes and drive the small mounting screws.
Pro tip: Install the first and last tuner, lay a steel ruler across them, and mark a straight line. Use that line to position every screw hole so the whole row sits perfectly straight.
Fit the truss rod cover by finding the centerline. Measure 21 mm (half of the 42 mm nut width) in from the nut center, extend that centerline down to the end of the headstock, and align the cover’s hole with it.
Section 8: Bolt the neck to the body
With the neck finished and the tuners on, join it to the body.
Seat the neck heel firmly and squarely in the pocket. Place the neck plate on the back of the body over the pre-drilled holes, then drive the neck bolts through the plate, through the body, and into the heel. If the heel holes are not pre-drilled, mark and drill pilot holes first using the method above. Tighten the bolts evenly and snugly, but do not overtighten, which can crush the wood or strip the threads.
Section 9: Mount the bridge, tremolo tailpiece, ground wire, and strap buttons
Offset guitars use a Tune-O-Matic-style bridge on two posts with a separate floating tremolo tailpiece behind it. Before you seat the bridge posts, run the ground wire, because it hides under a bushing.
To route the bridge ground wire:
- Find the small hole that links a bridge post hole to the electronics cavity.
- Strip 1 to 2 mm of insulation off the wire to expose the bare strands.
- Thread the wire so the bare strands sit flush against the bridge post bushing.
- Bend a small hook in the top of the wire so it stays at the top of the bushing hole.
- Seat the bushing (a rubber mallet helps) with the ground wire pinned flush against it.
- Screw the bridge posts into the bushings.
This grounds the strings through the bridge and quiets the guitar when you touch the strings. Fit the tremolo tailpiece to its mounting, and set the bridge posts roughly to height for now. You will dial in action later.
Finally, fit the strap buttons: the rear button at the center of the lower bout, and the front button on the top horn. Their placement affects how the guitar balances on a strap, so follow the standard pilot-hole procedure for each.
Section 10: Position and mount the pickups
Identify the neck and bridge pickups. The bridge pickup usually has a taller or deeper surround. Set each pickup into its route on its springs, foam, or surround, and mount it with the height screws through the surround or pickguard. Leave final height for the setup stage.
Section 11: Wire the electronics
Good solder joints are the difference between a quiet, reliable guitar and one that crackles. If you are new to soldering, practice on scrap first.
Soldering fundamentals:
- Tin the iron tip (keep a light coat of solder on it) and wipe it on a damp sponge so it does not oxidize.
- To make a joint, heat the lug or tab itself, then feed solder onto the heated metal so it flows in. Do not melt solder on the iron and dab it on.
- Solder melts around 185°C (365°F), and a soldering iron can reach 480°C (900°F). Keep it well clear of the finish and your fingers.
- Hold each wire still until the joint cools, then tug it gently to confirm it is solid. A weak joint will fail later when you fit the controls.
Know your layout. Offset kits ship with one of two standard wiring layouts. Check which one you have, and follow the diagram that comes with your kit:
- Option 1: one volume and two tone controls, two capacitors, and a 5-way selector.
- Option 2: one volume and one tone control, and a 3-way selector.
Connect each pickup’s bare ground wire to the back of a volume pot casing, and each insulated hot wire to the correct selector or pot lug per your diagram.
Mounting the controls. How you fit the controls depends on your kit:
- If your kit uses a control plate or pickguard, wire the whole assembly on the bench first, then drop it into the body and screw it down. This is by far the easier path.
- If your kit has an enclosed cavity with no rear cover, you draw each control in through the nearest cavity opening. Install the output jack first, then the bridge-side volume and tone, and finish with the neck-side controls. Use a length of cotton thread or a soft flexible hose (not fishing line) to pull each pot shaft into position, secure it with its washer and nut, then remove the thread. If a pot shaft is too short to reach through the top, you may need to countersink the hole slightly. Fit the knobs last, after you have tested everything.
Section 12: Set up your guitar
String it up, tune to concert pitch, and keep checking your tuning through the entire setup. Every adjustment below shifts the others, so work in small steps and retune often.
Neck relief (truss rod). Hold down the string at the first fret and the last fret at the same time, then tap the low-E string at the 12th fret. You want a tiny gap, a slight relief.
- If the string sits flat on the fret with no gap, add relief by loosening the truss rod (counter-clockwise).
- If the gap is too large, reduce relief by tightening the truss rod (clockwise).
- Adjust in one-eighth to one-quarter turns only, retune, and recheck each time.
Action (string height). Measure from the top of the 12th fret to the underside of the string. A good baseline is 2.4 mm on the low-E side and 1.6 mm on the high-E side. Raise the action by loosening the bridge posts, or lower it by tightening them. Tune up again before you re-measure.
Intonation. Compare the open harmonic at the 12th fret with the fretted note at the 12th fret. They should match.
- If the fretted note is sharp, lengthen the string by moving the saddle back (intonation screw counter-clockwise).
- If it is flat, shorten the string by moving the saddle forward (intonation screw clockwise).
- The bridge is already angled to compensate for the heavier bass strings, so expect the saddles to sit in a staircase.
Pickup height. Press the string down at the last fret and measure from the top of the magnetic pole piece to the underside of the string. A safe baseline is 2.4 mm, then adjust to taste using the screws on the pickup surround. Closer is louder and brighter but can pull the strings out of tune. Further away is softer and rounder.
Final checks. Play every string at every fret and listen for buzzing, adjusting relief or action if needed. Switch through every pickup position, and turn every volume and tone control, to confirm the wiring is solid and quiet. Check your tuning one last time.
Beginner watch-outs
| Watch-out | Why it matters and what to do |
|---|---|
| Rushing the build | Hurrying is the most common beginner mistake. Read each section fully before you start it. |
| Dust and fumes | Wear an N95 mask for sanding and an R95 mask for finishing, and always work with ventilation. |
| Veneer or thin tops | Remove glue stains with warm water and a rag, not sandpaper. A veneer is too thin to sand. |
| Grain not filled | Open-pore woods will not finish flat unless you fill the grain first. |
| Headstock margin | Keep at least 15 mm between the last tuner hole and the edge, or the headstock becomes weak. |
| Wrong pilot hole size | Too small splits or snaps the screw. Too large and it will not grip. Aim for two-thirds of the thread thickness. |
| Too many finish coats | More than three coats a day can stop the first coats from curing. Respect the one-hour or 24-hour respray window. |
| Mixing finish brands | Different brands or types can refuse to bond. Stay in one product system for sealer, color, and clear. |
| Cold or weak solder joints | Tug-test every joint. A joint that fails now will fail when you fit the controls. |
| Setting up out of tune | Tune to pitch before and during every relief, action, and intonation check. |
Pro tips
- Pro tip: Fill the grain before you stain. Color lands more evenly, and a tinted filler makes the grain pop.
- Pro tip: Build a scrap-wood handle that screws into the neck pocket so you can finish and hang the body without touching wet paint.
- Pro tip: Install the first and last tuner, lay a steel ruler across them, mark a straight line, and use it to place every screw hole dead straight.
- Pro tip: Use a card template for any custom headstock shape. It is easier to cut and adjust than timber, and you only commit to wood once you like it.
- Pro tip: Keep any custom shape simple. A well executed simple design beats a poorly executed complex one.
- Pro tip: If your kit uses a control plate or pickguard, solder the whole assembly on the bench. It is far easier than working inside the body.
- Pro tip: For a deep dive on finishing, Mark recommends the book “Guitar Finishing Step-by-Step” by Dan Erlewine and Don MacRostie.
When you get stuck
Take your time, and do not force anything. Questions about a step? Comment below and we will help you right here. If a part looks wrong, is missing, or arrived damaged, email our support team at [email protected] with the email address you used for your purchase, your order number, and a photo, and the team will get you sorted out quickly. When your build is done, share it in the DIY Guitars category so the community can see what you made.
Ready to start? Grab the Offset Electric Guitar Kit and build something you will be proud to play.